Soil Principle : Soil and Seed Composting
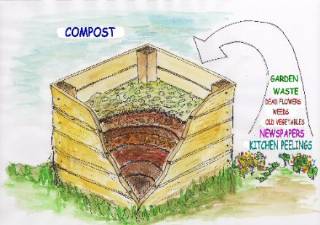
Composting is the second leg of the three-legged stool. GB composting strives to produce the maximum amount of compost from the materials used. It also maximizes microbial biodiversity through a correctly built and “cured” compost pile using plant material from your farm, food scraps from your kitchen, and soil from the beds.
Healthy compost is broken down plant material that returns nutrients and carbon to the soil, so the soil regains fertility and waste is minimized. Quality compost in the soil provides sustained release of nutrients for plant roots and microorganisms. It provides more aeration for roots and microbes. Compost helps buffer challenging soil conditions, like high or low pH, or too much clay or sand. The organic matter in compost also helps increase water retention, so you need to water less. By using compost to support soil fertility you can be more self-sufficient and rely less on purchased organic fertilizer.
To make GB compost, start by picking any space available to put your compost pile, maybe even on a growing bed. Next, gather your materials, collect them over time and/or use what you have on hand:
1. Mature Material — Did this plant grow to its old age and produce seed? If so, the plant is mature and made up of material that is complex and tougher to breakdown. Think of a corn stalk after it has borne fruit. It is structurally strong.
2. Immature Material — Did this plant grow to its old age and produce seed? If not, the plant is immature and made of material that is less complex and easier to break down. Think of alfalfa plants or lettuce leaves that are very flexible. It can sometimes be hard to differentiate between mature and immature materials, so just do your best.
3. Soil — this comes from the first trench of soil you removed during the double dig. Keep a little around after double-digging for compost building.
4. Roughage -— This is plant material that is thick and tough and will take many compost piles before it decomposes. Think of branches from trees or stalks of cassava. Roughage is used once in each pile, so only a small amount is necessary.
Now you are ready to build:
Step 1 Gently loosen the soil where you will build down to 12 in (30 cm), so the pile can drain.
Step 2 Apply roughage about 4 in (10 cm) thick so the pile can drain and breathe.
Step 3 Apply a layer of mature material, about 2 in (5 cm) thick and water until evenly moist.
Step 4 Apply a layer of immature material, about 2 in (5 cm) thick and water until evenly moist.
Step 5 Apply a layer of soil about ¼ in (½-1 cm) thick and water.
The soil plays an important role, helping to stabilize the moisture and temperature levels of the pile and inoculating it with microorganisms.
Step 6 Repeat steps 3 through 5 until you have used up your materials or the pile is tall enough for you to stop working on it, whichever comes first.
Notice that you are using equal volumes of mature and immature materials. This is an important component in producing healthy compost, as both the structural integrity of the mature material and the less-structural immature material contribute to the process of decomposition and the humus-formation that make compost so valuable.
If your pile was short when materials ran out or it shrinks a lot, you may want to keep adding to the pile when you have more material, until you decide to call your compost pile finished. Finishing a pile within one month is a good guideline. When you are done building, an additional layer of soil on the top will help the pile to hold moisture. Your compost pile will begin to shrink after you build it.
Because compost is the result of decomposition, maintaining a compost pile is about creating the ideal conditions for this process. Decomposition is carried out by microorganisms in the presence of moisture and air; therefore, the pile must have enough moisture (like a wrung-out cloth) and enough air (too much moisture limits air). You have four strategies to create the moisture balance you want: a) You can loosen your pile, b) water your pile, c)cover your pile or d) do nothing. In some climates, it may be necessary to water the entire pile, or at least the edges daily, to retain moisture. Pile location can help with this too, as shaded piles will retain moisture better. If you notice a sour smell or white color, your compost pile may be anaerobic (not enough air, too much water); loosen it to add air. If the materials are not breaking down, your pile may be too dry; water it and/or cover it to hold the moisture. If all is going well, enjoy observing this miraculous process!
Labels
agriculturefermenterpruninggardening techniquesgardening suppliesgardening toolsgardening helpproductionfeedstockfarmergardening tipssubstrateenergyplantbiogasgardening trickssustainablekerr center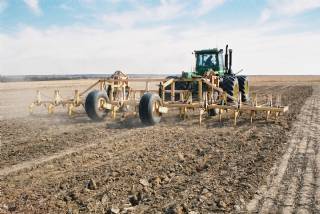
Farming Principle: Deep Soil Preparation
Looking at GB as a three-legged stool, deep soil preparation is one of the legs. Deep soil preparation builds soil and soil structure by loosening the soil to a depth of 24 inches (60 cm). Ideal soil structure has both pore space for air and water to move freely and soil particles that hold together nicely.
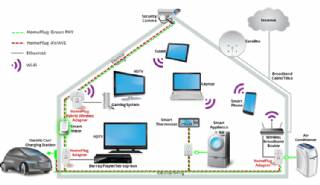
Smart Home Ecosystem - Smart Home Automation - Smart Home Security - Smart Home Technology
The outer-most level corresponds to the individual devices and sensors that consumers interact with. Several candidates are vying for the role of a leader introducing smart home services to the mass market.
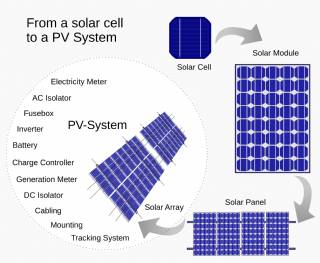
Solar Energy Systems - Solar Modules - Solar Electric System Design - Solar Power
The heart of a photovoltaic system is the solar module. Many photovoltaic cells are wired together by the manufacturer to produce a solar module. When installed at a site, solar modules are wired together in series to form strings. Strings of modules are connected in parallel to form an array.
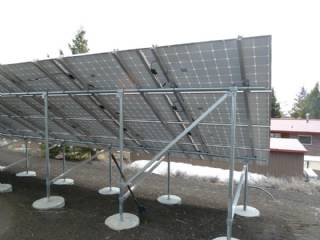
Solar Energy Systems - Array Mounting Racks - Solar Ray - Solar Panel - PV Racks and Mounts
Arrays are most commonly mounted on roofs or on steel poles set in concrete. In certain applications, they may be mounted at ground level or on building walls. Solar modules can also be mounted to serve as part or all of a shade structure such as a patio cover. On roof-mounted systems, the PV array is typically mounted on fixed racks, parallel to t
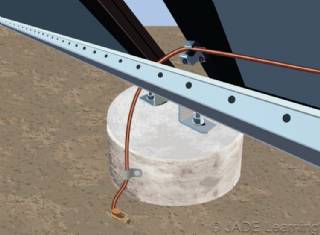
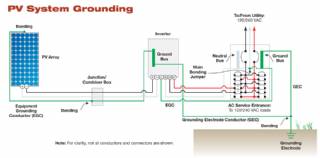
Solar Energy Systems - Grounding Equipment
Grounding equipment provides a well-defined, low-resistance path from your system to the ground to protect your system from current surges from lightning strikes or equipment malfunctions. Grounding also stabilizes voltages and provides a common reference point. The grounding harness is usually located on the roof.
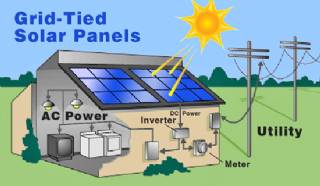
Solar Energy Systems - Solar Inverter - Solar Panel Inverter
Most grid-connected inverters can be installed outdoors, while most off-grid inverters are not weatherproof. There are essentially two types of grid-interactive inverters: those designed for use with batteries and those designed for a system without batteries.
Solar Energy Systems - Solar Disconnects
Automatic and manual safety disconnects protect the wiring and components from power surges and other equipment malfunctions. They also ensure the system can be safely shut down and system components can be removed for maintenance and repair.
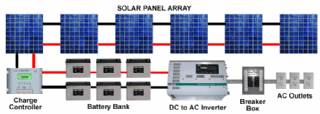
Solar Energy Systems - Solar Battery Bank
Batteries store direct current electrical energy for later use. This energy storage comes at a cost, however, since batteries reduce the efficiency and output of the PV system, typically by about 10 percent for lead-acid batteries. Batteries also increase the complexity and cost of the system.
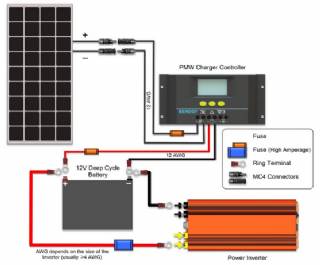
Solar Energy Systems - Solar Charge Controller
A charge controller, sometimes referred to as a photovoltaic controller or battery charger, is only necessary in systems with battery back-up. The primary function of a charge controller is to prevent overcharging of the batteries. Most also include a lowvoltage disconnect that prevents over-discharging batteries. In addition, charge controllers pr
Solar Energy Systems - The NEC and PV Systems
Solar PV systems must be installed in accordance with Article 690 of the National Electric Code, which specifically deals with PV systems, as well as several other articles of the NEC that pertain to electrical systems in general. When there is a conflict between NEC 690 and any other article, NEC 690 takes precedence due to the unique nature of PV